
This post may contain affiliate links, meaning at no additional cost to you I may earn a small commission when you click a product or company link. As an Amazon Associate I earn from qualifying purchases.
Sound familiar? You’re in the middle of (attempting to) take some nice photos of your kids (who never. stop. moving), and all of a sudden your phone pops up that dreaded message: your iPhone storage is full, and you’re going to have to delete something before you can save any more photos.
It’s a good idea to regularly go through your phone and clean things up–your phone will run faster and last longer when you don’t overstuff it. So keeping your phone’s space clean is just good stewardship. And technology is a whole lot less useful if it’s cluttered and difficult to use.
But sometimes we lose track of things and the storage just fills up. So here are 27 ways you can free up space when your iPhone storage is full. And to make the regular upkeep easier, I’ll also give you some tips for keeping things uncluttered so you can “set it and forget it.”
Table of Contents
1. Start by checking which apps are using the most storage space.
When you go to Settings > General > iPhone Storage, your phone will provide you with a report detailing how much space each of your apps is using. Apps are listed in order of what’s using the most space so you can get an excellent idea of what to tackle first.
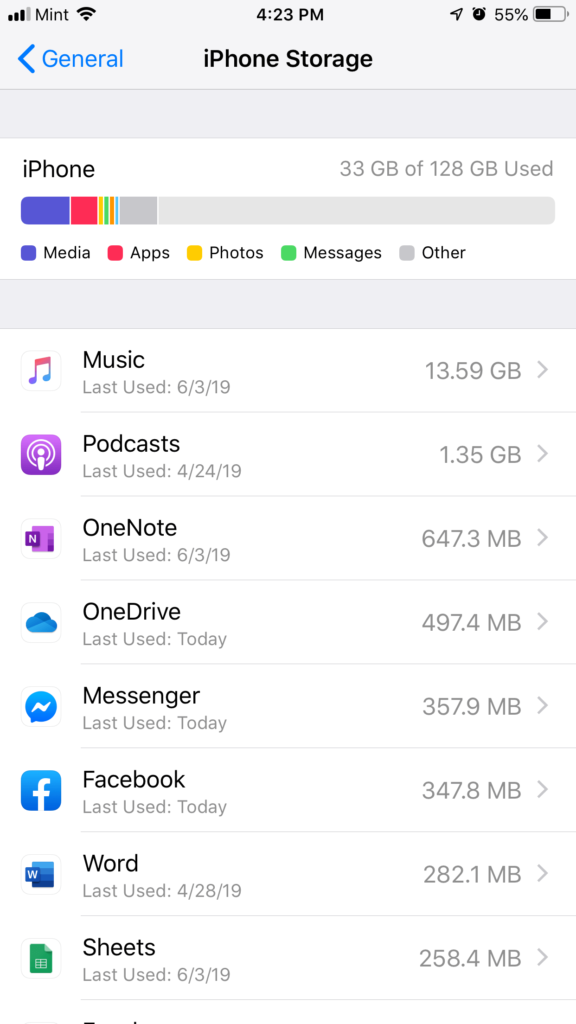
You may even see recommendations here for how to free up space on your iPhone. Recently my phone was suggesting I remove large attachments from my Messages app.
Take some time to explore this screen. From here you can do quite a bit of storage cleanup by tapping on individual apps.
For example, to delete data from the Messages app:
- Go to Settings > General > iPhone Storage.
- Tap on the Messages app.
- Under Documents & Data tap on
- Top Conversations or
- Photos or
- Videos or
- GIFS & Stickers or
- Other to see what data is stored in those categories.
- Tap “Edit” in the top right corner to select multiple files to delete OR swipe left on individual files to delete them.
Follow similar steps to free up space that your other apps are using. You’ll have to poke around a bit here to see which apps will let you delete their data.
Related: 17 Practical iPhone Tips to Make You Feel Like a Pro
You could free up a huge amount of storage on your iPhone from the iPhone Storage screen alone–and many of the recommendations that follow can be handled from here. But if you need more ideas, read on for some other steps you can take to make the “iPhone storage is full” message go away for good.
2. Delete videos when iPhone storage is full
Videos can take up a TON of storage space, so it’s a good idea to start here before deleting any photos. I love to get video evidence of my kids doing cute things, but sometimes I have to take several minutes of video for a few seconds that I can share with the grandparents. That means I end up with video taking up way more space than I need it to.
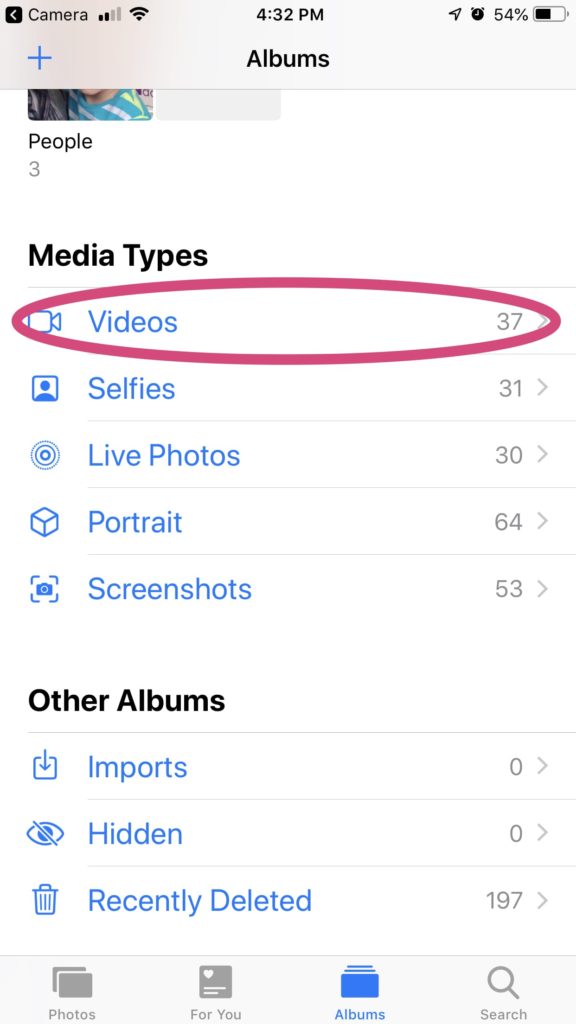
To delete videos in your photo library on iOS 12, use the following steps:
- Open the Photos app and go to Albums.
- Scroll until you see “Media Types.”
- Tap “Videos.”
- Tap “Select” in the top right corner.
- Select all videos you want to delete.
- Tap the trash can icon in the lower right and then tap “Delete Videos” to confirm.
3. Delete photos to free up space
You knew I was going to get to this one, didn’t you? It’s a bit of a pain to go through them all, but unneeded photos can pile up. Deleting them can save you a lot of space.
Old screenshots? Those 15 selfies from when you were trying to get a good shot to post on Facebook? The random pics that just didn’t turn out the way you expected? Those 117 blurry photos of the couch your son added while playing with your phone? (Yeah, that happened.)
Time to pick the best and ditch the rest.
Deleting photos in iOS 12 is similar to deleting videos:
- Open Photos > Albums.
- Tap “All Photos.”
- Tap “Select” in the top right corner.
- Select all photos you want to delete.
- Tap the trash can icon in the lower right and then tap “Delete Photos” to confirm.
4. Delete extra photos from burst mode
Burst photos are just a little bit different from regular photos. When you hold down your shutter button in the camera app, it will take a burst of photos. It’s a good option for taking an action shot. But those bursts take up lots of space if you don’t delete the extras.
If you want to delete an entire burst, you can delete it just like you delete regular photos, above. (When you see a burst in your Photo app, it looks like a stack of photos instead of a single photo.)
If, however, you want to pick the best shot(s) and delete the rest, you’ll need the following method.
To delete extra burst photos:
- Open Photos > Albums.
- Scroll down to “Media Types” and select “Bursts.”
- Tap on the burst you want to edit.
- Tap “Select” at the bottom.
- Select the photos you want to keep.
- Tap “Done” at the top.
- Tap “Keep Only Favorites.”
The favorites will be saved as individual photos and the rest will be deleted.
5. Delete photos and videos from texts and iMessages
Those photos and videos you receive from your loved ones can take up a lot of space in your iPhone. They won’t show up in your Photos app, so here’s what you’ll need to do to delete them.
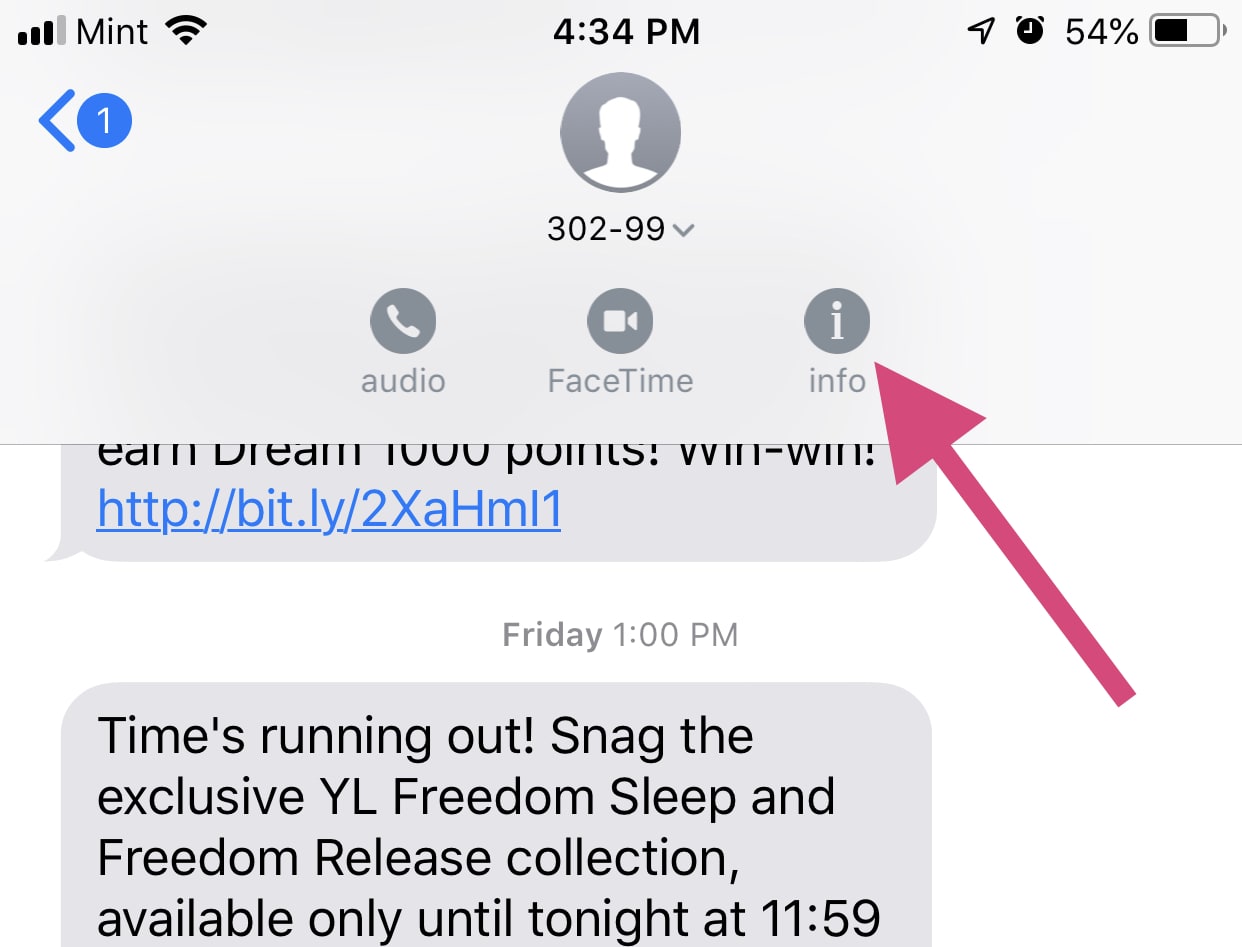
To delete media files from individual message threads:
- Open the Messages app.
- Open a message thread.
- Tap on the person’s name at the top of the screen.
- Tap the “info” button that slides down.
- Touch and hold an image until a menu pops up.
- Tap “More…”
- Now tap all the photos and videos you’d like to delete.
- Tap the trash can icon in the bottom right corner.
- Tap “Delete attachments” to confirm.
Note that you can also delete Message photos through the iPhone storage screen from tip #1.
6. Purge photos from other photo-heavy apps
Do you have an Instagram folder in your Photos app? If the photos are already on Instagram, you probably don’t need them on your phone too… especially if free space is at a premium. Delete the Instagram folder and move on.
Maybe you have Snaps you’ve saved to a Snapchat folder. It’s time to assess whether you really need to save them.
And while you’re at it, check the folders from your photo-editing apps to see if there’s anything you’re ready to delete. To paraphrase KonMari here, if it no longer brings you joy, delete it.
7. Stop saving Instagram photos
This one will help you keep the “iPhone storage is full” message away for the long run.
If you have the Instagram app set to save a copy of the photo to an album on your phone after you upload it, you end up with two copies of every photo you upload. That adds up fast…
Now, if you love the filters and the cropping you apply when you upload a photo, maybe you’re super set on keeping that setting on. (If that’s you, I’d suggest deleting the original after you upload so that you still have only one copy.)
But if you’d like to stop Instagram from automatically saving images to your phone, here’s what you need to do.
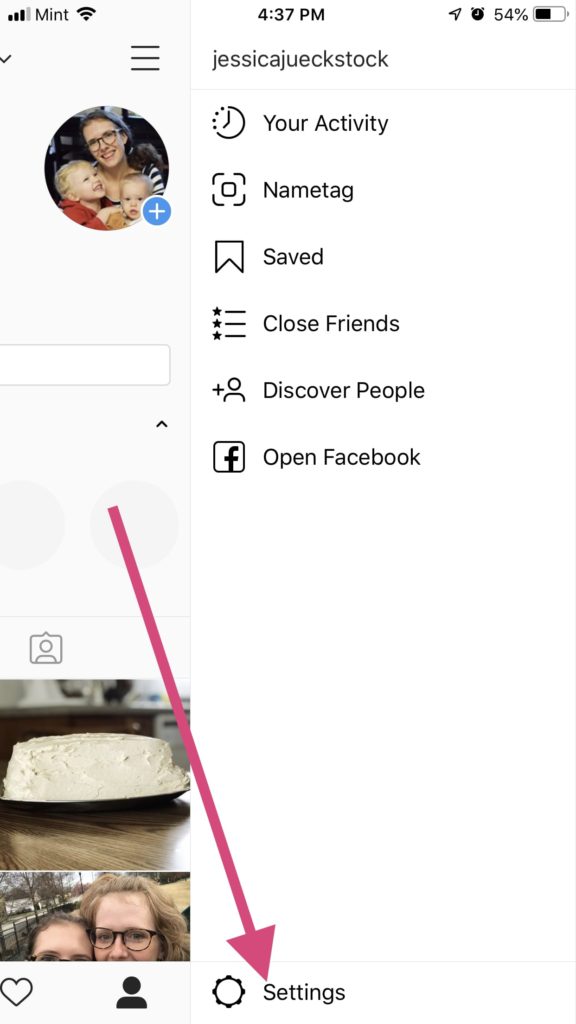
In the Instagram app:
- Go to your profile.
- Open the hamburger menu at the top right.
- Tap “Settings.”
- Go to “Account.”
- Tap “Original Photos.”
- Toggle “Save Original Photos” to OFF.
By the way, Instagram isn’t the only app that provides you with this option. So it’s worth checking the settings in your other photo-heavy apps, such as WhatsApp, to see if they’re automatically saving to your photos too.
8. Save only one copy of a photo in HDR camera mode
Here’s another longterm solution. HDR (High Dynamic Range) photos are composites of 3 nearly instantaneous photos that your phone takes when you’re in a high-constrast setting, such as for outdoor landscape photography.
With iPhone 8 or newer, the camera will decide for you when HDR is appropriate; otherwise, it’s a setting you’ll manually turn on when you take a photo.
This post goes more into the details of HDR and how and when to use it with an iPhone.
By default, when you take HDR photos, your phone will also save the original photo. While this setting can be helpful for determining which photo you actually want to keep, if you’re not deleting the other photos as you take them the storage space you’re using will just keep adding up.
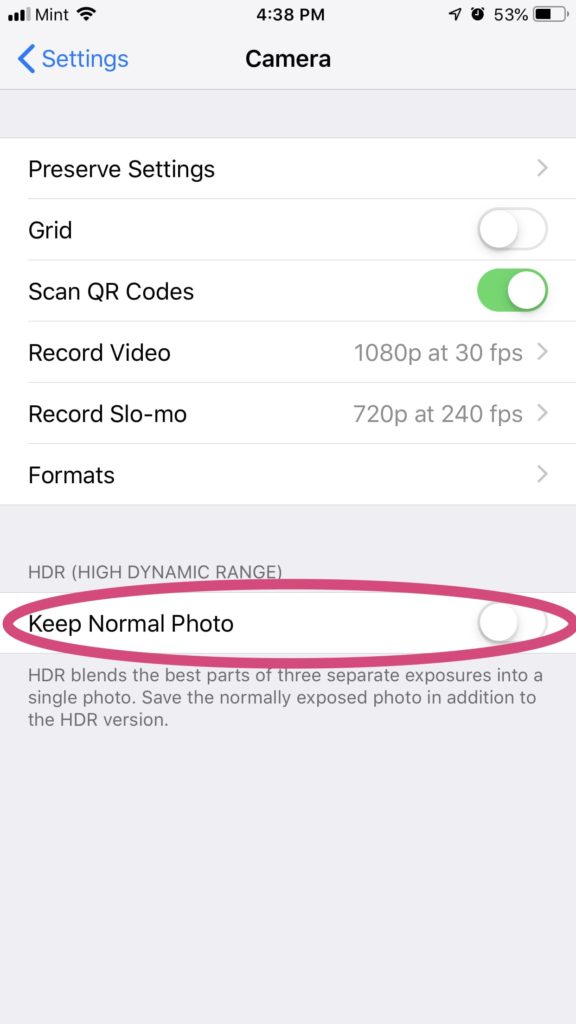
To turn off saving both copies in HDR mode:
- Go to Settings > Camera.
- Under HDR, toggle “Keep Normal Photo” to OFF.
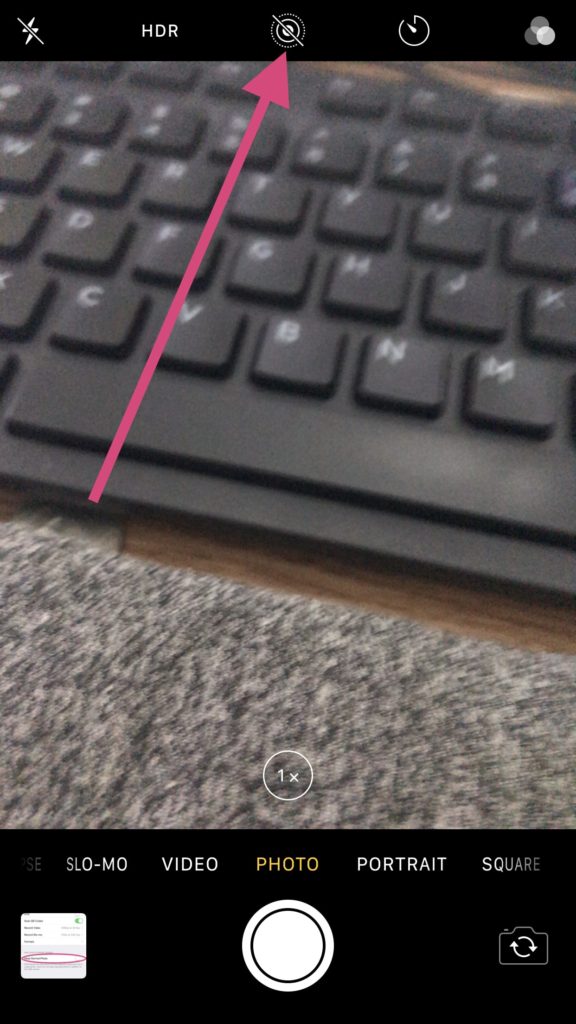
9. Turn off live photos
Live Photos are pretty cool… but definitely not necessary, especially if you’re trying to save space. They use a lot more storage space than regular photos. To turn off Live Photos, open the Camera app and make sure the three concentric circles icon at the top is white with a diagonal line through it. If it’s gold, Live Photos are on. Tap the icon to turn off.
10. Empty deleted pictures folder
After you’ve deleted all your extra photos and videos you may still find that your iPhone storage is full. That’s because your phone has a “Recycle Bin” of sorts for your deleted photos. Files are automatically deleted from this folder within 40 days, but you can also delete them manually to free up space.
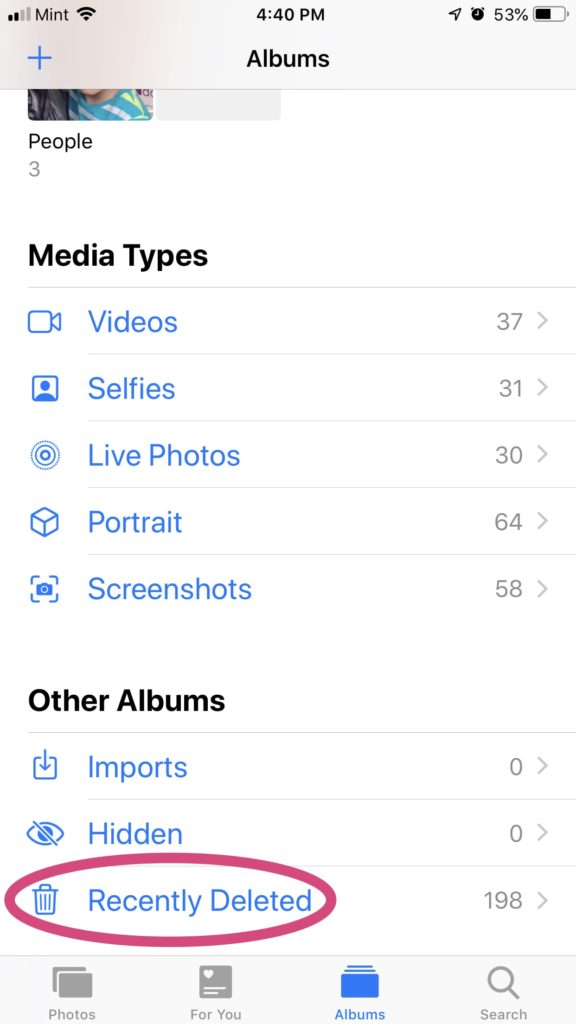
To empty deleted pictures:
- Open Photos > Albums.
- Scroll down to “Other Albums.”
- Tap “Recently Deleted.”
- In the upper right tap “Select”
- Tap “Delete All” in the lower left.
- Tap “Delete Items” to confirm.
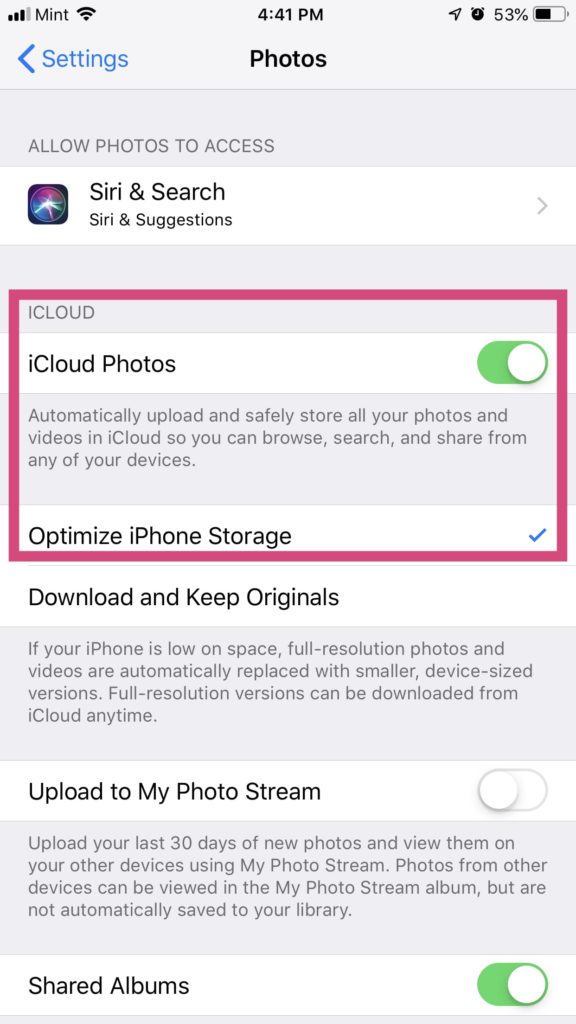
11. Optimize your photo storage
To reduce the amount of space that your Photo library takes up, optimize your photo storage. (This option is available only if you’re using iCloud Photos.)
To turn on storage optimization:
- Go to Settings > Photos.
- Toggle iCloud Photos to ON.
- Make sure “Optimize iPhone Storage” is selected.
Now, if your iPhone storage is getting near to full, your full resolution photos will be saved in iCloud while your iPhone will keep smaller resolution versions.
12. If iPhone storage is full, use cloud storage for photos and videos
I know. It’s hard to decide what to delete, and sometimes it kind of hurts, doesn’t it? If you just can’t bear to say goodbye but still need extra space, consider storing your files in the cloud. You’ll be able to access your memories from any device and won’t have to worry that your iPhone storage is full.
Just remember that you won’t be able to view all of your files if you’re offline. If you’re using iCloud, your iPhone will store some of your most recent files locally, but not all of them. In most cases this won’t be an issue, however, since cellular networks and WiFi are practically ubiquitous.
Here are several good options.
iCloud
The nice thing about storing your phone’s files in iCloud is that with an iPhone, it just works. Every Apple account comes with 5 GB of iCloud storage for free, so you get access to this storage as soon as you set up your new iPhone.
how to move photos from iPhone to iCloud
Simple, simple, simple.
To turn on iCloud Photos:
- Go to Settings > Photos.
- Toggle “iCloud Photos” to ON.
- Make sure “Optimize iPhone Storage” is checked for optimal space savings.
Your photos will move to iCloud automatically. If you have a large photo library, it may take some time to upload your photos to iCloud. But once it’s uploaded, iCloud will automatically manage your photo library for you–downloading locally as needed and deleting from your phone (but keeping the originals in iCloud) to free up space on your iPhone.
The downside to iCloud is that the free account is only 5GB, which you can use up pretty quickly if you’re storing lots of photos and videos. You can, of course, upgrade to more storage for a monthly fee, and if you’d rather keep the simplicity of iCloud, that’s a great option.
To upgrade your iCloud storage:
- Go to Settings and tap on your name.
- From this screen go to iCloud > Manage Storage > Change Storage Plan.
- Choose your new plan.
The primary downsides of using a non-Apple solution are that you will have to be a little more hands-on with your storage. You can set files to automatically upload to your cloud solution, but…
- If you want to delete a photo, deleting it from your Photos app will not automatically delete it from the cloud. You will have to access the cloud solution to delete it there if you don’t want any copies of it anywhere.
- Uploading your photos to the cloud will not automatically remove them from local storage on your phone. You will have to manually remove photos from your phone once they’re uploaded to the cloud.
If, however, free is a priority for you, read on for more options.
Google Drive
If you’re willing to give Google access to even more of your data, you can get unlimited storage for photos and videos with Google Photos. Note that this unlimited storage is only for the “High quality” setting–photos are downsized, if needed, to 16 megapixels (1080p resolution for videos) before saving.
For the average person, “High quality” should be fine. But if you want to store your original photos, you get only 15GB free storage.
Besides unlimited storage for high quality photos, Google Photos offers other neat features, like creating animations when you take several photos in a row of the same scene and adding fun effects to your photos.
By the way, if you’re just a little uncomfortable with Google’s and other ad networks’ access to everything, take a look at my post on Chrome’s privacy settings. And move along to choose a different storage solution.
I no longer add files to Google Photos, but I still have a rather large collection there from before my switch from Android to iPhone. One of these days I will organize my online files and create a more structured storage system!
If you’d like to use Google Photos as your cloud-storage solution, first download the app for your phone.
Then, to set up automatic photo storage with Google Photos:
- Open the Google Photos app.
- Tap the hamburger menu in the top left.
- Tap “Settings.”
- Select “Back up & sync.”
- Toggle “Back up & sync” to ON.
Wait for your photos to upload to Google Photos. Once everything is uploaded, you can safely delete the photos from your phone to free up your iPhone’s storage space.
Amazon
If you have an Amazon Prime membership, in addition to free two-day shipping and loads of video-streaming options, you get unlimited free photo storage. You can also share your photo storage with up to 5 other people, so your entire family can use the space.
From the Amazon Photos app, you can use image search to find photos, share photos with family and friends, order prints of your photos, and more.
Regular (non-Prime) Amazon accounts get 5GB free storage.
To set up Amazon Photos as your phone’s automatic photo-storage solution:
- For unlimited photo storage, sign up for Amazon Prime, if you haven’t already. (Use this link for a free 30-day trial.)
- Download the Amazon Photos app and sign in with your Amazon account.
- Tap the hamburger menu labeled “More” at the bottom right.
- If Auto-Save is turned off, you’ll see “Auto-Save is turned off” at the top. Tap this.
- Tap “Turn On.”
Wait for your photos to upload to Amazon Photos. Then you can safely delete photos from your iPhone.
OneDrive
This is the one I’ve recently started using. If you have a subscription to Office 365 (totally worth it for the best productivity tools out there–Word, Excel, OneNote, PowerPoint…), you also have access to 1TB of cloud storage. That’s a lot of storage space–about 330,000 photos, to be exact.
Even if you’re storing documents too, it will probably be a while before that runs out!
To enable automatic uploading of your photo library to OneDrive:
- Install the OneDrive app.
- In the OneDrive app tap on the person icon in the top left corner.
- Tap “Settings.”
- Tap “Camera Upload.”
- Toggle “Camera Upload” to ON.
- If you want to upload videos as well, make sure “Include Videos” is toggled to ON.
- Toggle “Upload In Background” to ON so that your photo library uploads automatically, even when you’re not using the OneDrive app.
Once your photos have uploaded to OneDrive, you can delete them from your Photos app to free up the space on your phone. Deleting photos from the Photos app will not delete them from OneDrive.
13. Use a portable external storage drive
One of the problems with a cloud-based solution is that you have to be connected to a network (whether that’s WiFi or cellular) in order to access your files. If you’re trying to keep your data usage low on a cheap cellphone plan, or if there are times you don’t have any network availability, you might want to consider an external storage drive for your extra files.
There are many lightweight, portable options designed specifically for the iPhone, such as this one and this one. Just plug them in and transfer your files over.
14. Delete any music you don’t listen to anymore
I know a lot of people use music streaming services like Spotify these days, but just in case you have music stored on your phone, you might want to go through and delete any music you don’t listen to anymore. Just in case, you know, you don’t still love the music you used to listen to in high school. (Please tell me I’m not the only one who still has music from the early 2000’s that I don’t listen to anymore…)
To delete songs from your phone:
- Go to Settings > Music > Downloaded Music.
- To delete everything, swipe left on “All Songs” and tap “Delete.”
- To delete everything by a single artist, swipe left on the artist’s name and tap “Delete.”
- If you want to delete an entire album, tap the artist’s name and swipe left on the album name.
- To delete a single song, tap the artist’s name, then the album name; then swipe left on the song name.
Deleting songs from your phone will not delete them from iTunes on your computer, so you can always add them back to your computer by plugging in and syncing if you change your mind later.

15. Use a music streaming service
Keep the music off your phone completely and use a streaming service to save storage space. Spotify, Apple Music, and Amazon Music (free 30-day trial) are all good options if you don’t mind paying a monthly fee for your music.
You can also pay a small one-time fee for an app like CloudBeats to stream music you already own from a cloud-based storage solution, such as DropBox or Google Drive.
16. Turn off “available offline” music
If you are subscribed to a streaming service such as Spotify or Apple Music, you may have playlists that are available offline. That means you can listen to that music when you’re not connected to a network.
But it also means the files are stored locally on your iPhone and using up your precious space. Unchecking “Available Offline” on a saved playlist will remove the playlist from your device and free up space when your iPhone storage is full.
17. Optimize your music and videos storage
If you subscribe to Apple Music, which allows you to access your music library from all your iOS devices and stream additional music, you can optimize your storage, similar to optimizing your photo storage.
To turn on storage optimization:
- Go to Settings > Music > Optimize Storage.
- Toggle Optimize Storage to ON.
18. Delete movies and TV shows from Apple TV
Again, any kind of video file can take up a lot of space on your phone. If you use Apple TV to watch movies and TV shows, deleting the files from your phone can save you space. Your movies and TV shows will still be available in cloud storage, so you can always re-download them if you want to watch them again.
To delete videos from Apple TV:
- Go to Apple TV > Downloaded.
- Swipe left on the movie or TV show you want to delete.
- Tap “Delete.”
19. Clear hungry apps’ cache
Some apps (such as Facebook) are storage hungry and will store huge amounts of data locally, using up your iPhone’s precious storage space. If you don’t mind entering credentials or restoring app settings, an easy way to clear the cache is to delete and reinstall the app.
To see which apps may be filling up your iPhone’s storage, use tip #1 above. From that screen you can delete apps, or you can delete them by holding down an app’s icon on your home screen until the “x” appears. Tapping the “x” will let you delete your app. Then reinstall from the App Store app and you’ll see that the app takes up less space.
See the next tip for more about deleting apps…
20. Delete or offload apps you aren’t using
You can delete apps the “normal” way by tapping and holding an app’s icon from the home screen. Or, you can revisit the iPhone Storage screen in Settings.
The iPhone Storage screen will tell you how long ago you last used a given app. Never used? Last used 6 months ago? Might be time to delete and move on.
If you have a lot of games on your phone, you may want to especially consider deleting those. The graphics and video in games mean they tend to take up a larger amount of space than other apps. You probably have better things to do with your life anyway, right?
To delete an app:
- Go to Settings > General > iPhone Storage.
- Find and tap on the name of the app you want to delete.
- Tap “Delete App.”
- Tap “Delete App” to confirm.
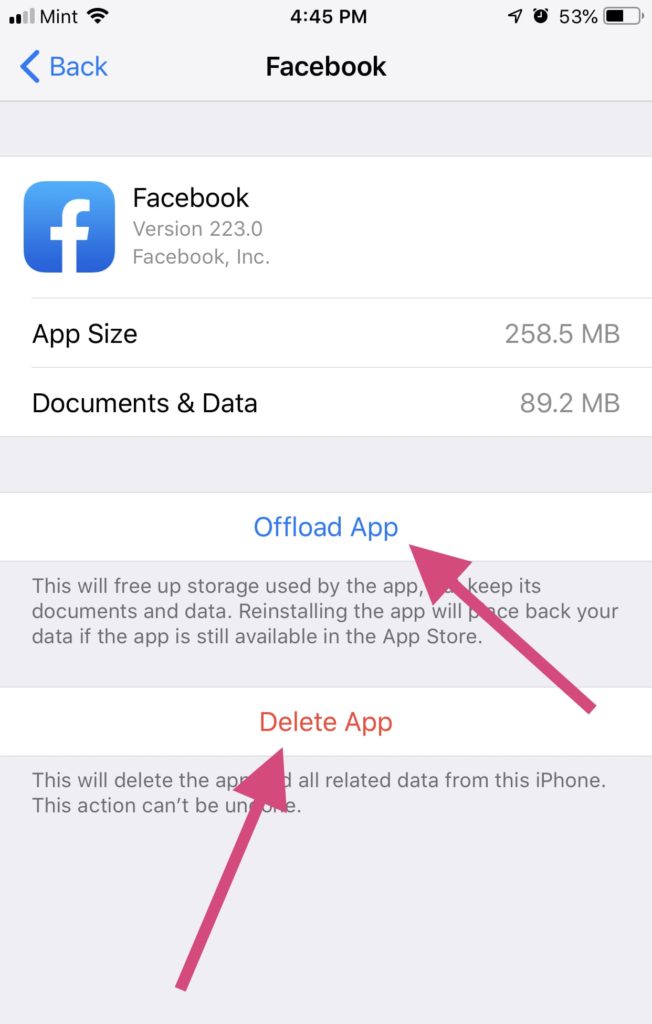
If you aren’t using the app now but plan to use it again in the future and just want to get rid of the app, not its data, you may want to offload the app instead. When you offload an app, you’ll save only the amount of space that the app itself is taking up on your iPhone–this amount is listed on the App’s detail screen as “App Size.”
The data associated with the app will not be touched, so you haven’t lost anything if you decide to reinstall later.
To offload an app:
- Go to Settings > General > iPhone Storage.
- Find and tap on the name of the app you want to offload.
- Tap “Offload App.”
- Tap “Offload App” to confirm.
Here’s what to do when you’re ready to use an offloaded app again:
- Go to Settings > General > iPhone Storage.
- Tap on the name of the offloaded app in your list of apps.
- Tap Reinstall App.
The app will be reinstalled with all of your data intact.
21. Delete old voicemails
I don’t know about you, but I get a half dozen spam calls daily. So annoying. From time to time, one of them will leave a spammy message. (Thank goodness for visual voicemail!)
Usually I delete those right away so they’re not taking up space unnecessarily on my phone. You can also delete messages from people you actually want to hear from, once you no longer need the information in the message.
To delete voicemail messages:
- Go to Phone > Voicemail.
- Tap “Edit” in the top right corner.
- Select the voicemails you want to delete.
- Tap “Delete” in the bottom right.
You can also delete an individual message by swiping left or by tapping the message and then tapping delete.
Just like with deleted photos, your phone will keep deleted voicemails in a Deleted Messages folder, like a recycling bin.
To force deleted messages to permanently delete:
- Go to Phone > Voicemail.
- Open “Deleted Messages.”
- Tap “Clear All” in the top right corner.
- Tap “Clear All” to confirm.
22. Delete texts and iMessages
Text messages don’t take up a huge amount of space individually, but they can add up if you don’t delete them. If your iPhone storage is full even after following all of the above steps, you may want to delete some of your messages.
For one thing, you probably don’t need to keep all those account verification texts. Or the weekly ads messages from your favorite store.
To delete individual messages:
- Open the Messages app.
- Open the message thread that has the message you want to delete.
- Tap and hold the message you want to delete.
- Tap “More…”
- Select any additional messages you want to delete.
- Tap the trash can icon in the bottom left corner.
- Tap “Delete Messages” to confirm.
To delete an entire message thread:
- Open the Messages app.
- Swipe left on the thread you want to delete.
- Tap the “Delete” button.
- Tap “Delete” to confirm.
In addition to the text content of your messages, the photos and videos you share via text can take up extra space on your iPhone.
To delete photos and videos (and other attachments) from your text messages:
- Go to Settings > General > iPhone Storage.
- Find and tap on the Messages app.
- Tap “Photos” or “Videos” or “GIFs and Stickers” or “Other.”
- Tap “Edit” in the top right.
- Select all the attachments you want to delete.
- Tap the trash can icon in the top right.
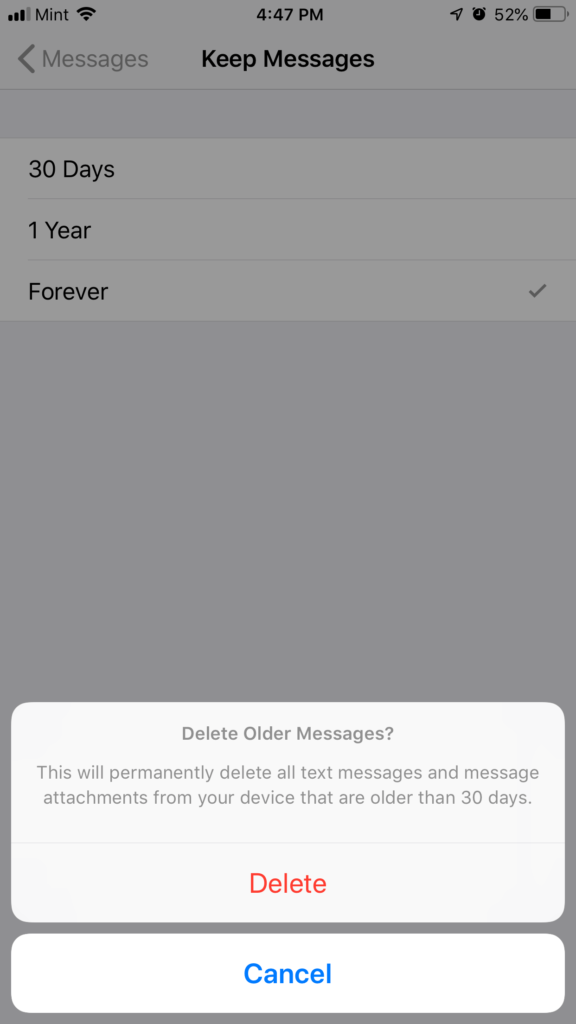
23. Mass-delete old messages (and set texts and iMessages to delete automatically)
Here’s an ongoing maintenance tip for helping to keep the “iPhone storage is full” message at bay. Set your messages to delete automatically after 30 days (or 1 year) and delete anything older than that all in one go.
To mass-delete and auto-delete old messages:
- Open Settings > Messages.
- Tap “Keep Messages” under Message History.
- Select either 30 Days or 1 Year.
- Tap “Delete” to delete all messages older than your selected time fram.
24. Delete books from Books and Kindle
Love to read? Me too. But all those books can take up (almost) as much space on your iPhone as they can on your physical bookshelf. OK, maybe not quite as much, but it can feel that way when your iPhone storage is full.
The nice thing about books in Apple’s Books app and Amazon’s Kindle app is that they’re stored in the cloud, so if you delete them from your iPhone, you won’t be deleting them for good.
In the Books app, if you don’t see a cloud icon under the title of the book, it’s been downloaded to your phone.
To delete downloaded books in Books:
- Open Books > Library.
- Tap the three-dots icon under the book’s image.
- Tap “Remove…”
- Select “Remove Download.”
To delete downloaded Kindle Books:
- Open Kindle > Downloaded.
- Touch and hold the book you want to delete.
- Tap “Remove from Device.”
25. Delete podcasts after listening
I’ve got to admit I haven’t completely jumped on the podcast bandwagon. I have a couple I’ll listen to occasionally, but I have too many other books or courses I’m working through at any given time to dedicate too much time to podcasts.
However, I know podcasts are extremely popular and it’s quite possible you have some episodes saved on your phone.
Podcasts take up quite a bit of space on your iPhone, so to free up that space, you’ll want to delete the episodes you’ve listened to.
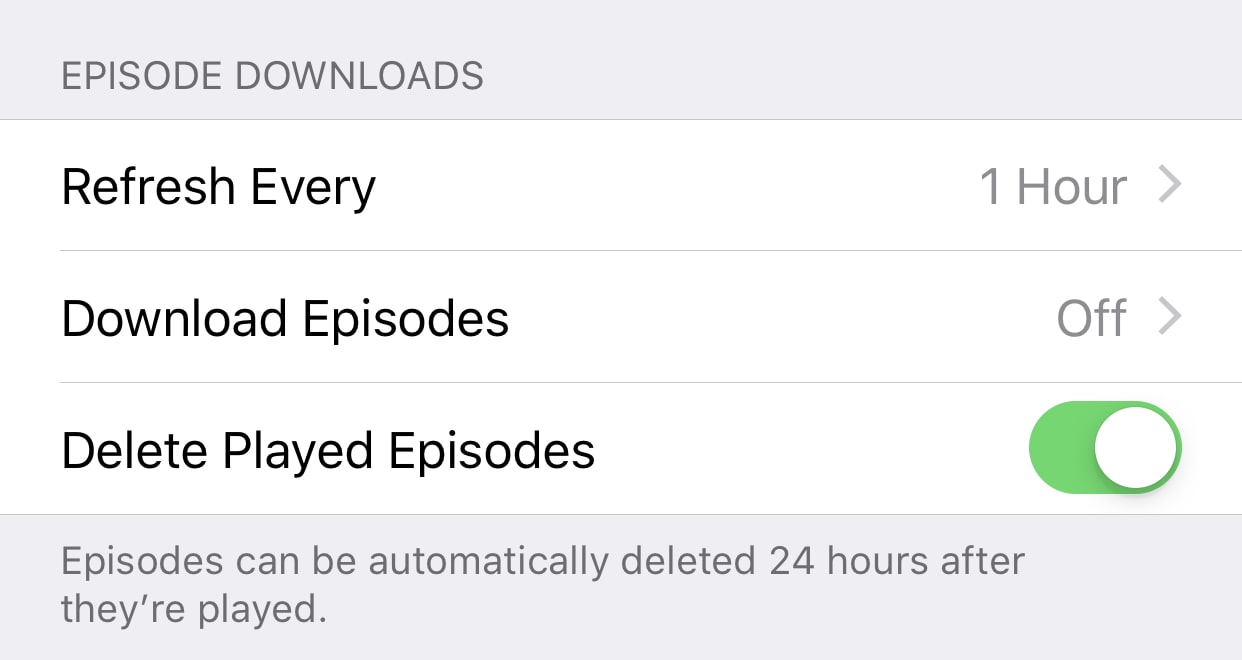
To delete played podcast episodes:
- Go to Settings > Podcasts.
- Scroll down to “Delete Played Episodes.”
- Toggle to ON.
26. Set podcasts to not automatically download
If you’re not listening to new podcast episodes on all the podcasts you subscribe to as soon as they come out, you may not want to automatically download new episodes. Again, those episodes can add up fast in your storage space, so it’s probably better not to download them until you’re ready to listen (and have them automatically delete when you’re done listening).
To turn off automatic podcast downloading:
- Open Settings > Podcasts.
- Tap “Download Episodes.”
- Select “Off.”
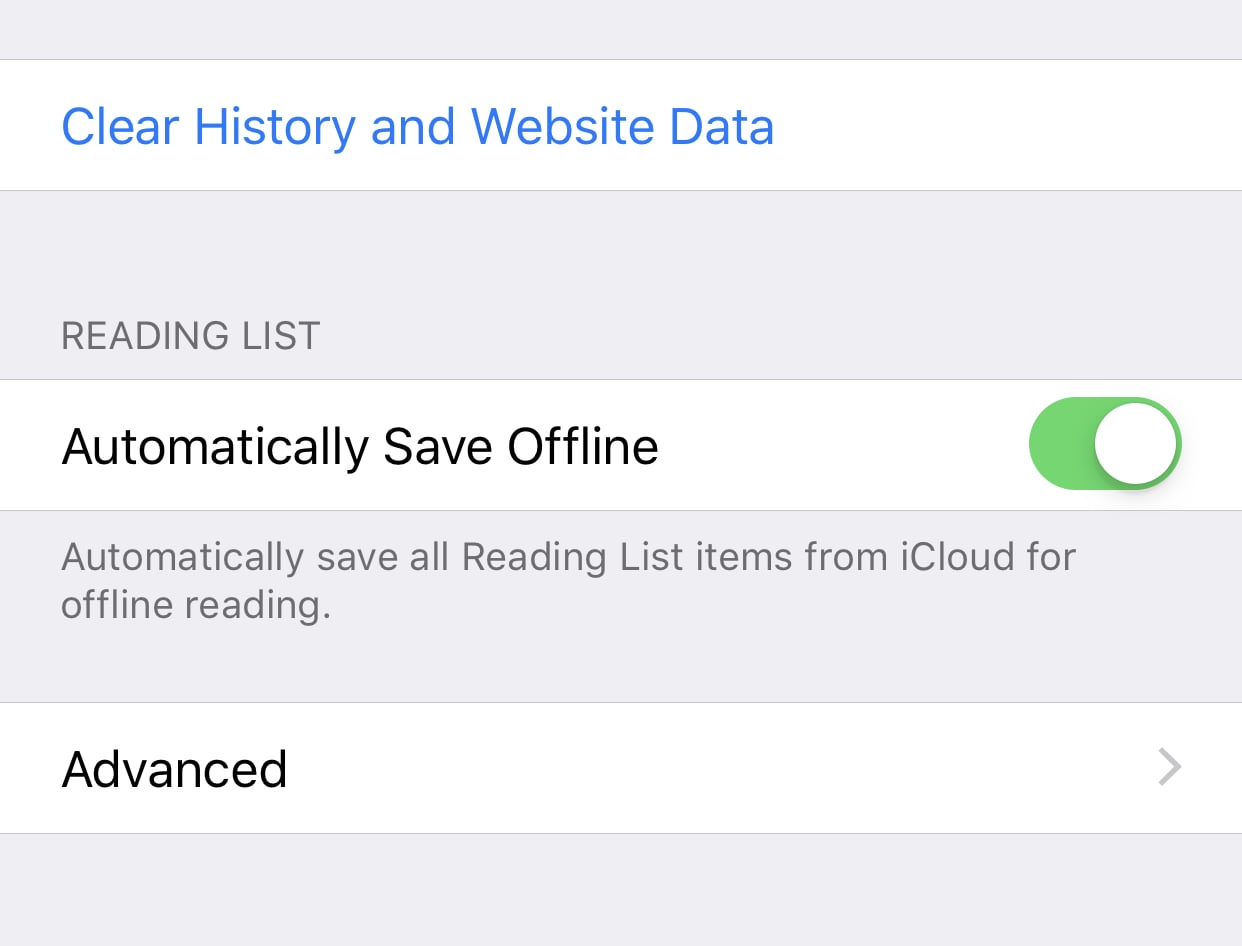
27. Clear your Safari cache when your iPhone storage is full
I think most of us these days do the majority of our web browsing on our phones–I know I do. Being always on the go or tending to kiddos, pulling out my phone to look something up or read an article while I have a couple free minutes is a whole lot more convenient than sitting down at my laptop. While I make a point of limiting my own screen time, my phone’s web browser still sees an awful lot of action.
When you browse the internet on your iPhone, Safari saves (caches) data (like images) from websites directly to your phone for faster loading. It also saves cookies and your browsing history. Over time those files can build up and take up too much of your precious storage.
To clear your Safari cache:
- Go to Settings > Safari.
- Tap Clear History and Website Data.
To delete just your cookies (and see who’s been tracking you!) while leaving the browsing history intact
- Go to Settings > Safari > Advanced > Website Data.
- Tap “Remove All Website Data.”
Note: clearing website data will also clear out any saved credentials and may close any open tabs, so you’ll be logged out of any websites you were logged into. Read about How to Use LastPass to make logging in again a little less painful across the board.
Summary
The “iPhone storage is full” message can be one of the most frustrating messages you’ll receive as an iPhone user, but it’s possible to quickly free up lots of storage with these tips, and automatically keep it free with just a few tweaks.
Our digital lives are so much less stressful when we aren’t carrying around loads of extra data that we don’t need, so make a habit of regularly assessing and reassessing your needs. I think you’ll find your life is more joyful when you make a point of being more intentional about what you do and don’t keep.
Was this post helpful? Be sure to save to Pinterest for later!
1 thought on “How to Free Up Space in iOS 12 When iPhone Storage Is Full”