

This post may contain affiliate links, meaning at no additional cost to you I may earn a small commission when you click a product or company link. As an Amazon Associate I earn from qualifying purchases.
I love lists. Before I started using OneNote as a digital bullet journal, I had lists everywhere. Backs of envelopes, sticky notes, old receipts, random scraps of paper. You name it, I probably used it for a list at some point. If you, too, are constantly writing lists and then forgetting where you put them, you may want to consider a OneNote to-do list.
OneNote is searchable and available for all your devices–laptop, web, and mobile, and your changes will sync across all your devices. You’ll never have to remember which scrap of paper you wrote the shopping list on again.
Want to learn to be an expert in effective to-do lists? Here’s how you can use OneNote to boost your organization and productivity.
Table of Contents
1. Use Tags to Quickly Identify Different Types of Tasks in Your OneNote To-Do List
OneNote offers tags to visually identify items in your notebooks. For example, a to-do list item is marked with a checkbox that you can check off when you’ve completed it.
But a checkbox isn’t the only way you can tag an item.
Here are some other ways you can tag items in your to-do lists:
- Use a star tag to mark an item as important
- Use a question mark if you need more information before you can complete an item
- Mark a task with an arrow to indicate you’ve moved it forward to the next day.
- Tag a reminder to call someone with a phone icon.

You can mix and match tags, so your to-do list items can have both a checkbox and a star, for example.
OneNote comes with several built-in tags, but you can also create your own tags if the built-in options aren’t enough.
To create your own tag in OneNote for Windows 10:
- Click the arrow next to the list of tags.
- Click “+ Create New Tag.”
- Type a name for your tag. (This is the name that will show up in the list of tags, so choose something that makes sense to you. For example, I created a “Migrated” tag with an arrow icon for items I move to the next day’s to-do list.)
- Choose an icon.
- Click “Create.”
You will now be able to tag items in your list with your new tag.
2. Use Keyboard Shortcuts
Do you ever sit down to make a list and find you’ve forgotten something halfway through? Your thoughts were just moving too fast, and now, no matter how hard you think, you can’t remember that last thing you mean to write down.
I’m a mom. So forgetting things is kind of par for the course now.
That’s why a digital to-do list is perfect for me–I don’t know about you, but thanks to junior high typing class I can type a lot faster than I can write with a pen.
Using a OneNote to-do list means you’ll forget what you were going to write a whole lot less frequently. And with keyboard shortcuts you can get your thoughts out even faster and easier.
To start typing a to-do list in OneNote, just hit Ctrl+1. Everything you type after that will be a checklist item. To check off items as you go, press Ctrl+1 again, and to stop making checkboxes, press Ctrl+1 a third time.
Other shortcuts for built-in tags:
- Ctrl+2: star an item
- Ctrl+3: tag an item with a question mark
- Ctrl+4: highlight to remember for later
- Ctrl+5: highlight to mark as a definition
OneNote will automatically assign Ctrl+6 and higher to your own tags as you create them.
3. Create Pages From List Items
If you have an item on your to-do list that is going to require you to compile more information–for example, maybe you’re writing a blog post and want a separate page to gather your notes, resources, and thoughts–you can automatically create a new page and link to it, right from your to-do list.
To create and link to a new page in OneNote:
- Type “[[“
- Write the title you want for the new page.
- Type “]]”
OneNote will automatically create a new page with the text of your to-do item and then link to it from your to-do list. Pretty clever!
You can see automatic page-link creation in the short video below.
4. Embed Files in Your OneNote To-Do List
A really cool feature of OneNote is that you can link to files directly from OneNote. Maybe an item on your to-do list is to balance your budget and you keep your budget in an Excel document. Embed the Excel file into your OneNote to-do list to quickly access the file.
You can alternatively use this feature to create a to-do list associated with the document itself. Have a file you’re working on and need to remember what still needs to be done?
Embed it into a OneNote page and then next to it write a to-do list of things you still need to do. I love how OneNote is as free-form as a physical notebook page.
To embed a file in OneNote:
- Go to Insert > File.
- Select the file you want to insert.
- In the dialog that pops up, choose how you want to insert the file. (Notes on the options below…)
- Wait for OneNote to insert the file.
Watch the short screenshare video below to see embedding files in action.
Options for embedding files
- “Upload to OneDrive and insert link”: choose this option if you want OneNote to show a live preview of the file–useful especially if it’s a file you’re collaborating on with someone else. A new copy of the file will be uploaded to your OneDrive account, which you can edit in Office online.
- “Insert as attachment”: choose this option if you want to be able to edit the file on your computer. A new copy of the file will be saved on your computer to OneNote’s EmbeddedFileFolder. There will be no live preview of the document, but you’ll be able to double-click on the file icon to edit it without being connected to the internet.
- “Insert as printout”: choose this option if you don’t care about editing the file from OneNote. You’ll see a “paper” printout of the file within OneNote and be able to annotate the file without editing the file itself. Changes to the file will not sync. I’ve used this option for many of my recipes. (Note that OneNote can search file printouts–pretty cool feature!)
Note that the live document preview with files you upload to OneDrive works only with Office files. (If you don’t have Office 365, I highly recommend it, as Microsoft’s Office programs really are the best for document creation. And it comes with 1TB of free cloud storage. That’s a lot of storage space.)
You can still insert non-Office files into your OneNote to-do list, such as a PDF, and you can still create a to-do list connected with the document.
However, you will have to choose the printout option (which won’t sync any changes) if you want to see the file’s contents within OneNote.
5. Use Search to Find Items Later
A huge shortcoming of written to-do lists is the ability to search them. Search is one of the biggest reasons I love digital note taking and list making. I use search all the time to find recipes in my bullet journal.
Trying to find that to-do list item you wrote about laundry? Just hit Ctrl+F and type “laundry.” OneNote will find it for you.
In OneNote you can refine your search results to
- All Notebooks
- Current Notebook
- Current Section
- or Current Page
6. Format Your OneNote To-Do List for Ultimate Productivity
I make a point of being intentional about how I use my time, so I always have ideas for things I want or need to be doing. When I really get going thinking of all the things to do, it’s easy for me to create a massive brain dump of a mile-long to-do list.
While it may feel good to get all those thoughts down on paper instead of having them floating around in my head (where I’m afraid I’ll lose them), what doesn’t feel good is looking at the massive to-do list when I’m done.
“Look at that huge list! Where do I even start?”
One of the best ways to get things checked off your to-do list without feeling overwhelmed is to segment your to-do list.
You can segment your to-do list in a couple different ways.
- By topic
- By priority/date
For example, these are some of the topical OneNote to-do lists I have:
- Upcoming blog posts
- Tasks for specific blog posts
- Monthly to-do lists
- Daily to-do lists
Within your topical to-do lists, you can also segment your list by priority. There are a few ways you can do this, either separately or in combination:
- Sort by priority
- Tag important items with the OneNote “Important” tag
- Create a priority grid
Creating a priority grid
One technique of sorting your to-do list by priority has been around for a long time. (This post credits the idea to President Dwight Eisenhower.)
Here’s how to do it.
First, do your to-do list brain dump. Write down everything you can possibly think of that you need or want to do.
Then insert a 2×2 table into OneNote:
- Go to Insert > Table.
- Select a 2×2 grid.
Sort out the tasks into the following categories in your table:
- Do right away
- Do later
- Delegate
- Drop
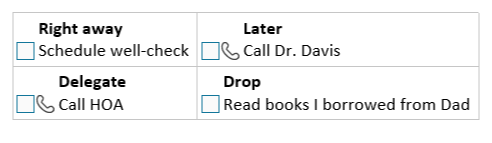
1. Do right away
These are your highest priority items. Maybe they’re the tasks you’ve been putting off for too long that absolutely must be completed today–like the well-child doctor’s visit that’s 2 months overdue. (That would never be me. Ha…)
2. Do later
These are the tasks that you should do if you have time but aren’t pressing. They can wait if they need to.
3. Delegate
Sometimes as moms I think we tend to pile too much on ourselves. We feel like if we don’t do it, it won’t get done, or it won’t get done right. But sometimes what we really need for our own sanity is to delegate tasks to someone else.
Maybe your husband can put away the laundry. Or you can assign your son to living room cleanup. Let go of the need for “perfection”–often done imperfectly is better than not done at all.
4. Drop
Have an item that you’ve been migrating from day to day on your to-do list? It might be time to assess whether it’s something you actually need to do or not. If you’ve been putting it off, it might not actually be a priority for you.
Let it go.
Conclusion
Using OneNote as a to-do list is a smart way to increase your productivity; and using tags, shortcuts, pages, file embedding, search, and a priority-based to-do-list format can help make you even more productive.
Do you use a OneNote to-do list? How do you make your to-do lists more effective? Let me know in the comments!
If you found these tips useful, I always appreciate a save to Pinterest.
Hi, I’m investigating the options for adding a file to One Note but am finding the absence of precise instructions and results a bit frustrating (- couldn’t Microsoft have done this?)
Your description is the best I’ve found but for option 2 you say “choose this option if you want to be able to edit the original file.” I’ve not found this to be the case. What happens on my computer is that a copy of the file is put into “C:Users>(name)>AppData>Local>Packages>MicrosoftOffice.OneNote_8wekyb3d8bbwe>LocalState>EmbeddedFileFolder>0-4
Is this your experience?
Thanks for the comment and question, Jim! What version of OneNote are you using? I believe the ability to edit the file you attach is a relatively new feature. If you attach a file and then double-click it within OneNote to edit it, do you not see the changes if you open the original file?
Wow, you’re right, Jim! I just checked and it’s saving it in the same place for me… This is very interesting because I thought for sure the original file was being edited when I tested as I wrote this post. I will update the post to reflect what really happens. Thanks so much for the comment!
I’m glad this comment was helpful, Jessica. I note that you say “but you’ll be able to double-click on the file icon to edit it without being connected to the internet”. This may be true but, you won’t, of course, be able to edit it on another device… which is part of normal activity these days. I was able to open and modify the document on my Surface Go (instead of the desktop machine on which the document was created) and, interestingly, a copy had been created in the AppData area as before. That couldn’t have been there if there had been no internet connection. So it’s all a bit of a mystery to me as the 2nd option does not have the functionality people might expect. Again, I wonder if Microsoft really analysed this correctly. What I would like to see in the list of options is the ability to link to a file already existing in my OneDrive file hierarchy, thus making good use of my existing folder structure. None of the 3 options here make this possible: the original file, even though it may be in the “right” folder is lost in each option and only accessible through copies. This seems a step backward. Surely Microsoft can’t want us to leave our OneDrive file structure and organise only through the use of OneNote? I love much of what MS does but quite often it seems to miss out on providing what users really need.
(I’m not sure I expressed myself as clearly as I hoped to do in my previous Reply. What I meant to make clear was that option 2 does indeed use the internet but in a different way to option 1.)
Yes, it’s a very strange arrangement, and I’m 100% with you that it seems like a step backward. I would definitely prefer an option that allows you to use your existing file structure, especially when we’re already storing files in OneDrive. It seems like the logical thing to do.
(I have detailed my current analysis of this function here: https://mrbrook1946.wordpress.com/2019/07/08/embedded-document-in-onenote/ Still a work in progress and comments and corrections welcomed.)